Tuesday, November 24, 2009

shaggy denim quilt


This is the second quilt that I have finished for Christmas. Two to go...Jake's quilt is almost finished(working on the binding). Zac's quilt has 4 or 5 blocks done. I'll share those when they are finished.


Ryder enjoying his brothers left-over oatmeal - I sure hope he uses that napkin:)

For Ryder's quilt I cut my denim into pieces that were the same width, but different lengths. I sewed the pieces right side together to make long strips and then sewed the long strips wrong sides together. SO...the quilt will have shaggy stripes. Make sense? Doesn't make much sense to me either. Anyway, I backed it with some fun shaggy minky and sewed the top, batting and back together along each side of the shaggy stripe. It is a nice warm rugged quilt. Perfect for the 18 month old who will be destroying..I mean loving it!


Tuesday, November 3, 2009

Milk Cartons


My sister made these milk cartons and filled them with whoppers to give to the primary teachers in her ward after they had their annual primary program at church. I LOVE them. I am going to be making some soon for something....maybe visiting teaching or thank you.s for the kids teachers...hmmm... She found these here and used the pattern from here.


Tuesday, October 20, 2009

letter pillow

I love letters!! I love letters on quilts, pillows, walls...etc. I am currently looking for a cool H for the wall.

Anyway, I decided to make my boys some letter pillows for their beds. Zac's pillows were small, so I (actually my mom made his) did his whole name. For the other boys I did large letters, so only their first initial.

Here is Jake's pillow on the couch.


I'm terrible with tutorials, but here it goes...if you have any questions or something doesn't make sense....leave me a comment and I will respond in the comment section or leave your email and I will send you an email.

How to make the pillows....this is what I did anyway:)
  • trace or draw your letter onto a piece of poster board...make sure that you take into account a 1/4-1/2" seam allowance, so that your finished pillow will be the size you want.
  • cut out the fabric for the front side of your pillow. make sure that the right side of your fabric faces the correct way.
  • cut out the fabric for the back side of your pillow. cut the back side so that the right side of the fabric is the mirror image of the letter...does that make any sense....your letter should be backwards on the wrong side of the fabric.
  • place the rights sides of your fabric together and pin, if you want...I didn't...I'm lazy like that.
  • sew a 1/4-1/2 seam around the fabric leaving a 3-4 inch gap open for stuffing the fiberfill into the pillow.
  • stuff the pillow to desired firmness.
  • hand stitch or machine stitch opening closed.
  • done.

Zac's pillows...I know they don't really match the bedding, he was temorarily sleeping in this bed when I took these photos.

Posted over at Kimba's DIY Day.

Monday, October 19, 2009

from gas fireplace to wood stove

We recently...as in just finished this past week...tore out our gas fireplace(my wonderful bro-in-law did most of that part:)) and replaced it with a wood burning stove. We are SO excited to burn some wood and stay warm this winter. We had some pretty high gas bills last year(not from using the gas fireplace), so we are hoping to save some money by burning wood. Last year to keep our gas bill from being TOO high, we kept the thermostat at 62 degrees and put some radiator heaters in the kids bedrooms so they wouldn't freeze.....this year maybe we can be WARM during the winter!! Now my husband is looking forward to the cold weather.


before
don't pay any attention to the fact that we STILL haven't cut in next to the crown molding.
Also...need new couches or slipcovers or SOMETHING!!

After
still need to re-attach the molding next to the door and lay some tile on the concrete between the rock and wood floor.

Thursday, October 8, 2009

Our 'Wall of Fame'


I have been working on a project to add to Whitney and Ashley's I Made it Without my Hubby project...but it is not quite finished yet:( I am still working on it...so check back soon.

Anyway...I REALLY want to win the pink hammer at Shanty 2 Chic, SO I am going to enter this project that I did without my Hubby last year.

We call this our Wall of Fame. It is an old window frame that I bought from a friend. One of the panes was broken, so I broke the other out replaced the glass with sheet metal to create a magnet board. My boys LOVE to check out their pictures, awards and tests on the wall.

I used my hubby's tin snips to cut the metal to the size of the openings and stuck it on with liquid nails. I sanded off the loose paint on the window frame and left the rest 'as is' and I love it!

Edited to add: I forgot to mention before...we also use this as a dry erase board...you can see a few red words that were wiped off, but never really cleaned...oops should have done that before I took the picture, but no time now. We are off to soccer practice.

Go check out the other fun projects at the I Made it Without my Hubby party.

Tuesday, October 6, 2009

Homemade Oreo Cookies

I have posted this recipe before at The Sisters Dish, so if you have ever checked out my other blog, you may have seen it already.

These cookies are SO good! They are super easy and only have a few ingredients! I really LOVE these cookies. Give these a try, you WON'T be disappointed!

The cookie in the picture above was dusted with powdered sugar while it was still warm, so it kind of looks like mold of something.....oops!
Homemade Oreo Cookies

Ingredients:

  • 2 devil's food cake mixes
  • 2 cubes/sticks butter
  • 4 eggs

Directions: Mix ingredients together. Roll into small balls(about 1 T). Place on an ungreased cookie sheet and bake for 8-10 minutes at 350 degrees. When cookies are cool spread filling on one cookie and sandwich with another.

Cream Cheese Filling

Ingredients:

  • 1/2 cube of butter
  • 8 oz. cream cheese
  • 1 t vanilla
  • 3 1/2 cups powdered sugar

Directions: Beat ingredients together until smooth

I'm posting this over at ASPTL DIY Day

Monday, October 5, 2009

before and after....front door

BEFORE...or actually during..


We moved into our home almost 2 1/2 years ago and we have MANY projects on our to-do lists!! One of them that was towards the top was STAIN front door and trim!! It took us a year before my husband dared try to stain the laminate door himself! I must say that I think it looks absolutely fabulous! I definite improvement!! He did a great job, now(for the last year and a half) I don't cringe every time I look at the front door as I pull into the drive.... instead I SMILE!!


After

I will be showing you other projects around the house as we finish them and can mark them off the list! It seems that our list just keeps getting LONGER, not shorter!

Another crocheted hat

When I saw this hat here. I knew I wanted to learn to crochet so that I could make one for myself. After I made one for myself I made one for my niece. I adjusted the pattern for her small little head. I love the little pink button that I found in my Grandma's sewing desk that is now mine:)


I wish that I had gotten a better picture before I gave it away! The band doesn't really look that big compared to the top of the hat....just took the second picture from a weird angle I guess:) I tried to get my little guy to model it, but he wouldn't keep it on long enough for a picture!

Tuesday, September 29, 2009

dresser drawers turned under-bed storage

We have been in need of a dresser for awhile now! We had an old one that was falling apart. Part of the drawers wouldn't come out and part would not go in. Since we can't afford a new dresser now and I haven't been having much luck finding one at a yard sale....I decided to re-purpose the one that we had. I pulled out the four drawers and went to work on two of them(I am going to do something a little different with the other two for another room).


Before
I started out by going to a local hardware store and purchasing some inexpensive trim and some new knobs. I already had one knob and needed to find three more to match. I used my husband's miter-saw(my first time) and cut 45 degree angles on the trim so that I could form a 'box' around the knobs. I'll tell ya....the miter-saw really scared me at first, but once I got started...it was not too bad! To measure the pieces, I cut my first long side and first short side and then just put those up to the molding and drew a pencil line to measure the next pieces.

Next, I just used some wood glue and glued the molding into place. I'm NOT much of a perfectionist, so don't look too close! If my husband was doing this project, he would have the trim cut PERFECT and glued Perfectly centered on the drawer.

Drawer with molding glued
Then...I sprayed the drawers with some primer and went to town painting them. Lastly....I added the knobs. I thought about adding casters, but it would have cost me about $4-6 more per drawer...so for now they are caster-less. They seem to slide in and out pretty easily though. I will add felt pads to the bottom, if they are ever used on the wood floor. Like I said..I'm NOT a perfectionist...at all!!....BUT I LOVE the end result! So much better than the blue drawers in the dresser and now we have more floor space.

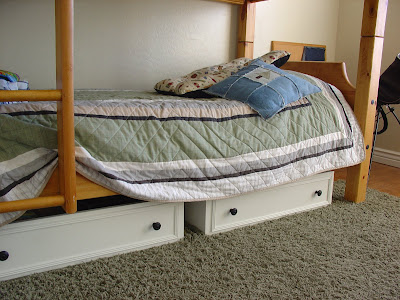
Finished drawers under bunk beds.
I will be adding this to Kimba's DIY Party at ASPTL.

Friday, September 18, 2009

Ruffled M Pillow


I made this ruffled M pillow for my niece for her birthday and I think it turned out SUPER cute!! I wish I could show you the back of the pillow. I put a cute ruffle on the flap where the pillow closes. My camera battery was SO dead. I was lucky to get these pictures. My sister was here from Utah and I got a picture of the back with her camera. Maybe when I get that picture, I'll show you all.

My sister and her cute little family got to come and visit for a week! We had a blast, well Amber and I did. Her husband spent most of his time here working:) He went with my husband to cut wood twice, chopped a lot of that wood, helped(or did most of the work) tear out our gas fireplace(we are putting in a wood burning stove) and lots of other odds and ends around here. He said he enjoyed it though. Guess he was missing the city(got bored:)), visiting us here in our small little town. We were all SO sad to see them leave and we will be happy to get together again soon.

Tuesday, September 15, 2009

Moda Fabric Giveaway....

Okay...so....I'm not giving away the moda fabric(I wish I was...maybe someday soon). Nicole over at Our Cozy Nest is. She is giving away TWO charm packs...two of my new favorite charm packs!! For a chance to win go visit Our Cozy Nest and leave a comment.


Nicole has a very fun blog with LOTS of great ideas!! Make sure you go check it out!

Tuesday, September 1, 2009

O is for Octopus


I have a little guy (3), actually he is "not little". He still as two more years until he can go to school like his big brothers. He is not too happy about that. SO we have been doing school at home. I tell him that it is his home preschool...and he calls it his 'freeschool'. Whatever right? The other day I found a pattern here to make this little octopus. We decided that I should make it and we would study the letter O for the day. For the O I just made a chain and then did a sc back down to the end of the chain, then stitched it together to form the O and then used the yarn to sew it to the octopus. I think it turned out pretty cute and my 3 year old LOVES it.

Cilantro Lime Shrimp Anyone?


For the recipe go to The Sisters Dish....here.

Thursday, August 20, 2009

My first attempt at crocheting


Actually this is not my FIRST attempt at crocheting. My Grandma taught me how YEARS ago...like 25 or so. When my grandma taught me to crochet I was so excited. I carried my yarn around and made LONG chains and sometimes did a single crochet stitch. My Mom taught me how to make a cute blanket...also SEVERAL years ago....BUT I never learned how to read a pattern and never really knew what the stitches were called.

I have wanted to learn to crochet for awhile now. I am enjoying learning to quilt, but I like to have a project that I can work on away from home...like up on the mountain at camp. I saw this pattern and decided to give it a try. I found some pretty great instructions, including videos on 'how to crochet' here. I was going to make this for my little guy, I thought that if I used a slightly larger crochet hook, it would be big enough for him....NOPE. So, I made a cute little flower and sent it to my sister for her baby girl. I wish my little niece was here so that I could get a picture of the hat on the model :)

Now I am working on tweaking the pattern to make a hat for my little guy. When I finish it I'll post a picture.

Monday, July 27, 2009

A new clothes line

I told my husband that I would like him to put up a clothes line for me to dry clothes on. After a quick glance to see if I was serious, he went to the garage and pulled out some line that he says is clothes line wire. Not sure if that is true, but if he says it is, it must be!!

He told me that he would make a quick line between two of our trees and we would 'try' it for awhile and if we decided we(or mostly I) like it he will work on something bigger. So far, I love it. My husband loves it too. He says, "the more money we save, the more money we have for cool gear!" He is a gear guy...loves his biking gear, camping gear, hiking gear...and so on and so on.

Here is our quick clothes line. I'll let you know if we ever get anything more. I have read that the clothes dryer accounts for ~6% of the average electric bill. We'll see if we actually save that much by line drying.

Thursday, July 9, 2009

'Wild Thing' Quilt

I finished Hunter's quilt!! This is only the second quilt that I have pieced and quilted on the sewing machine. I am trying to get brave enough to try stippling, but until then, I will continue straight stitching:) For Hunter's quilt I used Camille's 'wild thing' pattern.

This quilt was a lot of fun! I wish the backing was a little lighter, but I used what Hunter chose. I used Moda's Arcadia fabric purchased from Cotton Patch Quilting. Right now they have the Arcadia charm packs on sale for $4(a GREAT deal).

One handmade Christmas present can be marked off my list. Now, if I can wait that long to give it to him. I'm going to have to hide it so that he will forget about it:)
Back of Quilt

Wednesday, July 8, 2009

Ruffle Pillow

I made this pillow this morning for a birthday party that we will be going to tonight. I think it turned out pretty cute. I the 'D' isn't actually as dark as the pictures make it look. I wanted the 'D' in the bottom corner, but now I wish I would have moved it in just a little...oh well...you live and learn right? I'm also thinking, MAYBE, I should have just done the D in white...what do you think?

Wednesday, July 1, 2009

Grocery Bag Dispenser

I found a tutorial for this at Moda Bake Shop. I Love that site!! They have SO many fun projects!! In Rachel's tutorial, she said she made hers in an hour. This one that I made took me at least two hours. BUT I was very happy about it considering I am a VERY newbie to the sewing world!!

My Mom will be getting this in the mail for her birthday in the next few days:) Can't wait to make one for myself:)

p.s. I used a Moda Soiree charm pack for this one. I ordered the charm pack from cotton patch quilting(wonderful company, great prices and super fast shipping!!). I wish this had been on sale when I ordered....might be sold out before I can order again:( oh well, maybe they will still have some on sale next time I order.

Friday, May 29, 2009

Letter Pillow

I made this little pillow for my niece today. I wish I would have rounded the edges a little, to avoid the cat ears on all corners. Oh well...there are a few things I would do differently next time:) I used the same fabric for the 'K' and the back of the pillow.

Thursday, April 30, 2009

Mother's Day Gift


Just thought I'd post a picture of what I made for my Mom for Mother's Day. I traced the hands of my 4 boys(the baby was NOT very cooperative) and made a cute pillow keepsake for Grandma:) This was a Fun and Easy project, however, a little time consuming:) (for me anyway).

Monday, March 2, 2009

My 3 favorite stain fighters


Hydrogen Peroxide - takes out blood. I learned this from my sis-in-law that used to work at a hospital. It is great!! I put my hydrogen peroxide in a spray bottle and spray it on the little(or big) spots of blood that my kids(and me) get on the clothes. Hydrogen peroxide is also a great disinfectant.

Hairspray - takes out ink. I have heard that the cheaper the hairspray the better it removes ink.

M30 - takes out grease and everything else. I found a shirt in my closet that had been laundered and had a grease spot on it that I hadn't noticed before washing it. I tried the M30 on it and it came out, even after it had been washed and dried!! I found the M30 at Dollar General for yep, $1.

Thursday, February 19, 2009

Simple Supper

I LOVE a SIMPLE supper!! We tried a new bean soup recipe last night! It was delicious! AND simple enough for my 8 year old to make. We served it with some yummy homemade bread. Find the recipes here(soup) and here(bread).


Wednesday, February 18, 2009

Valentine

I really wanted to get this posted before Valentine's Day, but it is tax season and my CPA husband has had the laptop under HIS control a lot lately and it is only going to get worse. Guess it is time to break down and start using the KIDS desktop:)
This is a fun treat and project that you could adapt for any holiday, occasion or just to make some one's lunch extra special with a sweet treat and note. I LOVE the heart paper clips. I am going to be using those all the time to attach sweet notes for my hubby and kids.

I made these YUMMY sugar cookies for the kids to take to school for their teachers. Check out The Sisters Dish for the recipe.

I made the bag toppers in just a couple of minutes. So easy!


This is how to do it:
Cut a white piece of card stock to the width of your bag and about 6-8 inches long. Fold it in half lengthwise.

Print Happy Valentine's Day(or whatever saying) on a piece of paper and cut the strip out.

Punch out a scalloped edge circle from some scrapbook paper and a piece of vellum paper. I used the super awesome scalloped punch that my sister gave me for Christmas. LOVE IT!!

Put it all together. Attach scalloped scrapbook paper to front of card stock, then layer vellum on top of that. Top with your word strip. Make a heart shaped paper clip(instructions here at How about orange...). Clip the folded card stock with your embellishment onto the bag. I just used plain old scotch tape to put the pieces together, because I didn't want to go upstairs to find my 'scrapbook' adhesive.

Sweet and simple.