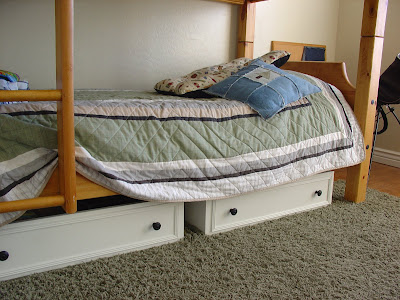
 We have been in need of a dresser for awhile now! We had an old one that was falling apart. Part of the drawers wouldn't come out and part would not go in. Since we can't afford a new dresser now and I haven't been having much luck finding one at a yard sale....I decided to re-purpose the one that we had. I pulled out the four drawers and went to work on two of them(I am going to do something a little different with the other two for another room).
Before
I started out by going to a local hardware store and purchasing some inexpensive trim and some new knobs. I already had one knob and needed to find three more to match. I used my husband's miter-saw(my first time) and cut 45 degree angles on the trim so that I could form a 'box' around the knobs. I'll tell ya....the miter-saw really scared me at first, but once I got started...it was not too bad! To measure the pieces, I cut my first long side and first short side and then just put those up to the molding and drew a pencil line to measure the next pieces.
Next, I just used some wood glue and glued the molding into place. I'm NOT much of a perfectionist, so don't look too close! If my husband was doing this project, he would have the trim cut PERFECT and glued Perfectly centered on the drawer.
Next, I just used some wood glue and glued the molding into place. I'm NOT much of a perfectionist, so don't look too close! If my husband was doing this project, he would have the trim cut PERFECT and glued Perfectly centered on the drawer.
Drawer with molding glued
Then...I sprayed the drawers with some primer and went to town painting them. Lastly....I added the knobs. I thought about adding casters, but it would have cost me about $4-6 more per drawer...so for now they are caster-less. They seem to slide in and out pretty easily though. I will add felt pads to the bottom, if they are ever used on the wood floor. Like I said..I'm NOT a perfectionist...at all!!....BUT I LOVE the end result! So much better than the blue drawers in the dresser and now we have more floor space.


19 comments:
Wow, those look great. I love how you added the trim on the drawer fronts, I may have to try that.
Wow! What a cool idea! I LOVE the added trim and the knobs! They really make a huge difference! ~Ashley
That is such a great idea! I love what you did with them! :)
great repurpose! Love the trim you added!
gail
What a great idea! They look so pottery barn-esque with the new trim and knobs!
Wow, that's awesome! You totally transformed those. Good job :)
I ran into your blog while looking up ruffelled pillows & I have to say I LOVE, LOVE, LOVE this idea. I'm in dire need of finding places for my kiddos toys. THIS IS THE WAY TO DO IT!
Thanks for the inspiration!
A great idea for anyone who needs more storage!
what a great idea! my kids' beds are too low, but i'll keep this in mind for the future.
That is just too cute! I love this idea...thanks for sharing!
Great idea! I love how the molding added so much character to the drawers. That could easily be done to an actual dresser too. Thanks for sharing!
Great idea! If you have enough clearance, you could put casters on the bottom. They look great!
I've been looking for a big old drawer to add castors to for under my kids' train table. But I hadn't thought about adding trim like that-very clever-should make finding a drawer easier-thanks!
I love it! The trim really added to it. Purdy!
Amazing idea! I had some drawers that don't like to slide in or out and am getting frustrated with them. This just might be the solution I am looking for! Thanks!!!
This is just the thing I need in our older boys' shared room as there is not enough room for another dresser. And I agree w/ everyone else, the trim is a really nice detail--great job!
Too cute. I was looking into getting some of those under bed storage containers, but these are so much cuter! Thanks for the great ideal!
Yay i LOVE DIY day! I seriously look at every single one of them! haha. Love the drawers!
Interesting article you got here. I'd like to read something more concerning that theme. Thank you for sharing this information.
Sexy Lady
Blonde escorts UK
Post a Comment