Showing posts with label Homemade. Show all posts

Wednesday, January 13, 2010

zig-zag quilt


This is the quilt that I made for Jake for Christmas. I used the tutorial here. Jake picked out the fabric he wanted to use and I think it turned out pretty good. As I look more closely at the pictures I see that I still have some threads to cut.

I'm not sure if I will post a picture of Zac's quilt here. I started making him a wonky star quilt, but only finished about 5 blocks and decided I'd better get something else done to have it by Christmas. I started his the Friday before Christmas and he LOVES it, but I'm not too proud of it:) Maybe I'll finish the wonky star quilt for him and then show it here:)

OOPS...somehow I got the picture of the back on the top. I have just started using photobucket and am still trying to figure it out. Any advice would be GREAT!! My computer has become SO slow since I have started blogging that I think it might be because I was just loading photos from my hard drive. Anyone know? Also, my pictures are SO big now. Are they too big? Can you see them without scrolling? When I have time I am going to try to take my blog back to 2 columns instead of three.

Anyway...here is Jake's zig-zag quilt.


Tuesday, November 24, 2009

shaggy denim quilt


This is the second quilt that I have finished for Christmas. Two to go...Jake's quilt is almost finished(working on the binding). Zac's quilt has 4 or 5 blocks done. I'll share those when they are finished.


Ryder enjoying his brothers left-over oatmeal - I sure hope he uses that napkin:)

For Ryder's quilt I cut my denim into pieces that were the same width, but different lengths. I sewed the pieces right side together to make long strips and then sewed the long strips wrong sides together. SO...the quilt will have shaggy stripes. Make sense? Doesn't make much sense to me either. Anyway, I backed it with some fun shaggy minky and sewed the top, batting and back together along each side of the shaggy stripe. It is a nice warm rugged quilt. Perfect for the 18 month old who will be destroying..I mean loving it!


Tuesday, November 3, 2009

Milk Cartons


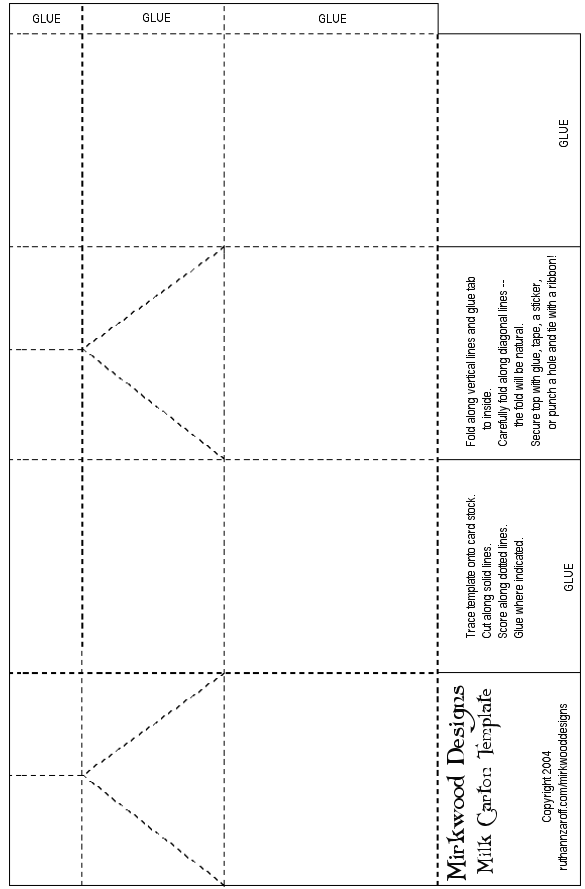
My sister made these milk cartons and filled them with whoppers to give to the primary teachers in her ward after they had their annual primary program at church. I LOVE them. I am going to be making some soon for something....maybe visiting teaching or thank you.s for the kids teachers...hmmm... She found these here and used the pattern from here.


Tuesday, October 20, 2009

letter pillow

I love letters!! I love letters on quilts, pillows, walls...etc. I am currently looking for a cool H for the wall.

Anyway, I decided to make my boys some letter pillows for their beds. Zac's pillows were small, so I (actually my mom made his) did his whole name. For the other boys I did large letters, so only their first initial.

Here is Jake's pillow on the couch.


I'm terrible with tutorials, but here it goes...if you have any questions or something doesn't make sense....leave me a comment and I will respond in the comment section or leave your email and I will send you an email.

How to make the pillows....this is what I did anyway:)
  • trace or draw your letter onto a piece of poster board...make sure that you take into account a 1/4-1/2" seam allowance, so that your finished pillow will be the size you want.
  • cut out the fabric for the front side of your pillow. make sure that the right side of your fabric faces the correct way.
  • cut out the fabric for the back side of your pillow. cut the back side so that the right side of the fabric is the mirror image of the letter...does that make any sense....your letter should be backwards on the wrong side of the fabric.
  • place the rights sides of your fabric together and pin, if you want...I didn't...I'm lazy like that.
  • sew a 1/4-1/2 seam around the fabric leaving a 3-4 inch gap open for stuffing the fiberfill into the pillow.
  • stuff the pillow to desired firmness.
  • hand stitch or machine stitch opening closed.
  • done.

Zac's pillows...I know they don't really match the bedding, he was temorarily sleeping in this bed when I took these photos.

Posted over at Kimba's DIY Day.

Thursday, October 8, 2009

Our 'Wall of Fame'


I have been working on a project to add to Whitney and Ashley's I Made it Without my Hubby project...but it is not quite finished yet:( I am still working on it...so check back soon.

Anyway...I REALLY want to win the pink hammer at Shanty 2 Chic, SO I am going to enter this project that I did without my Hubby last year.

We call this our Wall of Fame. It is an old window frame that I bought from a friend. One of the panes was broken, so I broke the other out replaced the glass with sheet metal to create a magnet board. My boys LOVE to check out their pictures, awards and tests on the wall.

I used my hubby's tin snips to cut the metal to the size of the openings and stuck it on with liquid nails. I sanded off the loose paint on the window frame and left the rest 'as is' and I love it!

Edited to add: I forgot to mention before...we also use this as a dry erase board...you can see a few red words that were wiped off, but never really cleaned...oops should have done that before I took the picture, but no time now. We are off to soccer practice.

Go check out the other fun projects at the I Made it Without my Hubby party.

Monday, October 5, 2009

Another crocheted hat

When I saw this hat here. I knew I wanted to learn to crochet so that I could make one for myself. After I made one for myself I made one for my niece. I adjusted the pattern for her small little head. I love the little pink button that I found in my Grandma's sewing desk that is now mine:)


I wish that I had gotten a better picture before I gave it away! The band doesn't really look that big compared to the top of the hat....just took the second picture from a weird angle I guess:) I tried to get my little guy to model it, but he wouldn't keep it on long enough for a picture!

Thursday, August 20, 2009

My first attempt at crocheting


Actually this is not my FIRST attempt at crocheting. My Grandma taught me how YEARS ago...like 25 or so. When my grandma taught me to crochet I was so excited. I carried my yarn around and made LONG chains and sometimes did a single crochet stitch. My Mom taught me how to make a cute blanket...also SEVERAL years ago....BUT I never learned how to read a pattern and never really knew what the stitches were called.

I have wanted to learn to crochet for awhile now. I am enjoying learning to quilt, but I like to have a project that I can work on away from home...like up on the mountain at camp. I saw this pattern and decided to give it a try. I found some pretty great instructions, including videos on 'how to crochet' here. I was going to make this for my little guy, I thought that if I used a slightly larger crochet hook, it would be big enough for him....NOPE. So, I made a cute little flower and sent it to my sister for her baby girl. I wish my little niece was here so that I could get a picture of the hat on the model :)

Now I am working on tweaking the pattern to make a hat for my little guy. When I finish it I'll post a picture.

Thursday, July 9, 2009

'Wild Thing' Quilt

I finished Hunter's quilt!! This is only the second quilt that I have pieced and quilted on the sewing machine. I am trying to get brave enough to try stippling, but until then, I will continue straight stitching:) For Hunter's quilt I used Camille's 'wild thing' pattern.

This quilt was a lot of fun! I wish the backing was a little lighter, but I used what Hunter chose. I used Moda's Arcadia fabric purchased from Cotton Patch Quilting. Right now they have the Arcadia charm packs on sale for $4(a GREAT deal).

One handmade Christmas present can be marked off my list. Now, if I can wait that long to give it to him. I'm going to have to hide it so that he will forget about it:)
Back of Quilt

Wednesday, July 8, 2009

Ruffle Pillow

I made this pillow this morning for a birthday party that we will be going to tonight. I think it turned out pretty cute. I the 'D' isn't actually as dark as the pictures make it look. I wanted the 'D' in the bottom corner, but now I wish I would have moved it in just a little...oh well...you live and learn right? I'm also thinking, MAYBE, I should have just done the D in white...what do you think?

Wednesday, July 1, 2009

Grocery Bag Dispenser

I found a tutorial for this at Moda Bake Shop. I Love that site!! They have SO many fun projects!! In Rachel's tutorial, she said she made hers in an hour. This one that I made took me at least two hours. BUT I was very happy about it considering I am a VERY newbie to the sewing world!!

My Mom will be getting this in the mail for her birthday in the next few days:) Can't wait to make one for myself:)

p.s. I used a Moda Soiree charm pack for this one. I ordered the charm pack from cotton patch quilting(wonderful company, great prices and super fast shipping!!). I wish this had been on sale when I ordered....might be sold out before I can order again:( oh well, maybe they will still have some on sale next time I order.

Thursday, April 30, 2009

Mother's Day Gift


Just thought I'd post a picture of what I made for my Mom for Mother's Day. I traced the hands of my 4 boys(the baby was NOT very cooperative) and made a cute pillow keepsake for Grandma:) This was a Fun and Easy project, however, a little time consuming:) (for me anyway).